

How To Install Wood Railing On Concrete
Safety Start: Install an Outdoor Stair Railing
Updated: Dec. 19, 2022
Add safe and fashion with a custom outdoor stair railing

Replace a wobbly old outdoor handrail with a stone solid one past using strong concrete anchors. We show you how to design and attach i to your steps.
You lot might likewise like: TBD
- Time
- Complexity
- Cost
- A full day
- Beginner
- $101–250
Overview: Benefits of a custom outdoor stair railing
A new iron handrail on the front steps volition raise your abode'southward curb appeal, but the real do good is the added condom it provides. Whether you need to supercede a wobbly erstwhile railing or add an outside railing for steps where at that place isn't one already, we'll show y'all how to order and install a new 1.
Iron handrails for physical steps range in price from $60 to over $150 per running foot. In addition, most companies charge several hundred dollars to measure for and install the railing. Here's where you tin can save cash. We'll show you how to measure out a uncomplicated set up of steps then y'all can order a custom front step railing and how to bolt the completed railing securely to your concrete steps. If your entry step is curved, has jogs or is an unusual shape, inquire the railing company to mensurate for yous.
Footstep 1: Order a custom outdoor stair railing

Photo 1: Measure the depth of the landing
Measure the depth of the landing. If you're installing railings on both sides, brand split sketches and take separate measurements for each side.

Photograph 2: Mensurate the landing slope
Lay a level on the landing and shim it until the bubble is centered. Then measure the gap betwixt the level and the landing.
Photograph 2A: Close-up of the gradient
Landings usually have slopes to drain off water.

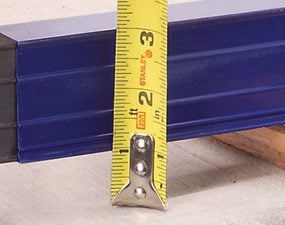
Photograph 3: Measure the "run"
Hold a level against the lowest stride and adjust it until the bubble reads plumb. Then measure from the border of the level to the border of the landing to determine the total "run" of the treads.

Photo 4: Measure the "rise"
Lay a level on the landing and adjust it until the chimera is between the lines. Measure out from the bottom of the level to the top of the bottom step to determine the full rise of the two steps.
Careful measuring is the key to a successful handrail order. Photos 1 through 4 show how to take the measurements y'all'll demand to order the railing. Record the measurements on a sketch equally we show below. Take the sketch to the railing fabricator to place the order.
Virtually big cities accept an fe railing fabricator that volition exist glad to prove you the railing designs information technology sells. There are a few standard styles, which only require you to choose between straight or twisted spindles, and perhaps whether you want the top rail to start with a "lamb'south tongue" like ours (Photo eight), or a coil.
We added a few upgrades to the basic front step railing to come up with our design. Start, we chose to install a brass cap rail. Then we added a second rail 4 in. beneath the peak. We also increased the size of the square spindles from the standard one/2-in. width to 5/viii in. for a heavier appearance. For an easy practise-it-yourself installation, ask the railing company to weld 3-in.-square stainless steel plates to the bottom of each mail service and drill 3/eight-in. holes in all iv corners. Then you lot tin can simply bolt the runway to the safety railing for stairs as nosotros bear witness here. Go a cost quote from your fabricator for the railing design y'all choose.
4 Measurements for a Perfect Fit
Make a elementary sketch and jot down 4 measurements to assist the fabricator build a perfect front end step railing.
Footstep ii: Install the outdoor stair railing in a few hours

Photo 5: Position the outdoor railings for steps
Position the outdoor railings for steps, making sure all the plates are an equal distance from the edges of the steps. Drill one pigsty at each end and drib in anchors to hold the railing in identify. Then mark the remaining holes past drilling one/2-in.-deep starter holes.
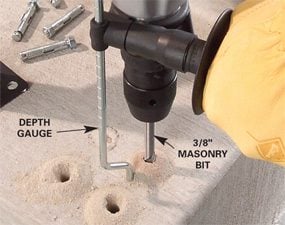
Photograph vi: Drill the mounting holes
Gear up the outdoor stair railing aside and drill ii-1/2-in.-deep holes. Blow the dust abroad from the holes.

Photo 7: Ready the anchors
Tap in the anchors. Then remove the basics, ready the railing in place and snug upward the nuts.
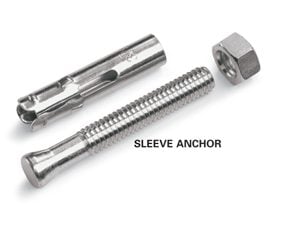
Photo 7A: Close-up of sleeve anchors
Tightening the nut tightens the ballast in the concrete.
After ordering your custom railing, yous'll probably have to look a few weeks for it to be completed. Only in one case you lot become it home, information technology'll simply take you lot a few hours to do a elevation-notch installation. The but special tool you lot'll need is a hammer drill with a 3/8-in. masonry bit. You tin rent a hammer drill for nigh $30 for four hours, and the bit will cost nigh $5. Purchase 3/eight ten one-vii/viii-in. sleeve anchors and five/sixteen-in. cap nuts for each. Brand sure yous article of clothing safety glasses and hearing protection when you lot're drilling.
Stiff anchors make for a sturdy railing. Sleeve anchors provide potent back up in solid physical. But the pressure the anchors exert as yous tighten the basics tin crack or "blow out" physical that'south not structurally audio. Before yous order a new handrail, brand certain the concrete is solid, that is, gratis of cracks and surface deterioration. If your steps are covered with brick or rock, materials that may easily crack, y'all may have to utilise another anchoring method. A two-part epoxy anchoring system oftentimes works better than sleeve anchors in these circumstances. Inquire the railing fabricator for advice before you society the rail.
Photos 5 and 6 show how to drill for and set the anchors. Set the railing on the steps with the border of the plates at to the lowest degree 1-1/2 in. from both the forepart and the side of the step. Adjust the railing position until the mounting plates are parallel with the side of the steps. Then mark the hole locations with the drill while the railing is in place to ensure accurate bolt placement. First past drilling ane starter hole through each of the end brackets and dropping an anchor bolt into the hole. This keeps the railing from shifting while you marker the remaining holes. When all the holes are marked, remove the railing and complete the holes by drilling them ii-1/two in. deep. Drill vertical holes; otherwise, the plate may not fit over the bolts. Set the gauge on your hammer drill for authentic hole depth.
When all the holes are drilled, tap ballast bolts into each one and set the railing in place (Photo 7).
Step 3: Shim the posts for a perfect installation

Photo eight: Plumb the posts
Check the posts for plumb with a level. If a post leans, loosen the basics and slide a sparse washer nether the side it leans to. Snug the nuts and recheck with the level.
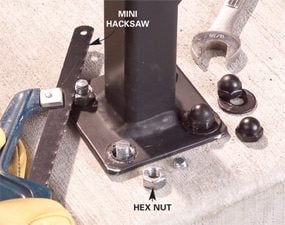
Photo 9: Trim the bolts
Saw the bolts affluent to the top of the hex basics with a hacksaw. Then remove the hex nuts.
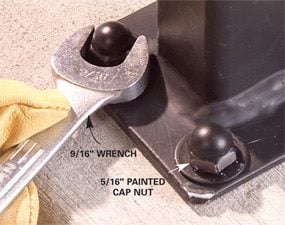
Photo 10: Install cap nuts
Thread cap basics onto the bolts and tighten them.
Snug up the bolts, but don't fully tighten them until you've checked the posts for plumb (Photograph viii). Out-of-level steps can cause the handrail posts to lean. Photograph eight shows how to check for and solve the problem. We used stainless steel washers for shims because they won't rust and are thinner than galvanized washers. They're readily available at hardware stores and home centers. Equally an added precaution against corrosion, spread a layer of polyurethane caulk under each plate earlier bolting them down. This keeps water out of the bolt holes and provides a little extra strength.
For a neater-looking task, nosotros cut off bolts that were as well long and replaced the hex basics with decorative cap basics (Photos 9 and 10). The railing company painted the cap nuts to match the railing.
Required Tools for this Handrail for Concrete Steps Project
Have the necessary tools for this DIY handrails for concrete steps project lined upwards before you start—yous'll salvage fourth dimension and frustration.
Required Materials for this Handrail for Concrete Steps Project
Avert final-minute shopping trips by having all your materials fix ahead of fourth dimension. Here'due south a list.
Originally Published: December xix, 2022

Source: https://www.familyhandyman.com/project/safety-first-install-an-outdoor-staircase-railing/
Posted by: curryhainced.blogspot.com
0 Response to "How To Install Wood Railing On Concrete"
Post a Comment